home |
emulator |
tapes |
information |
help |
contact |
The Atari Programmable USB Joystick Interface
the background
So as we were testing the new Android version of the emulator we connected up a bluetooth Spectrum Keyboard it had the right feel on the keys, we had the spectrum on the TV but something was missing, Playing Jetpac and Space Raiders just didnt feel right and the kids were unimpressed (really!) :\... what was missing.... !!! JOYSTICK! We were missing a joystick.. If we add a genuine unwieldyy, clunky, mechanical joystick we can make the whole expreince more authentic and even harder to play games.
the task
So we looked at creating a gamepad interface but modern game pads just dont give the that authentic feel so settled with the original Atari compatible joysticks of the day.
This would now make things a little more complicated as we would need to create a USB firmware to comunicate with the host computer and then code an interface to power and read the Joystick
So we first wrote a USB HID Joystick/Joypad interface but this felt restrictive due to the fact each game then requires the input to be redirected to the emulation of the Joystick interaces we currenty do (not all games have a joystick option), We decided a much better design (cunning if you will).. it make the Joystick act as a Keyboard such as the original Sincalir interface did, So pressing the joystick in a direction would in effect press a corrisponding key, Now just like the many original joystick interfaces this is great as long as the game has been writen with the interface in mind or matches the keys used... hmm most didnt :(
So like the programable interfaaces of the time what if we could redefine the keys the Joystick uses then we could cover most games which allowed keys and then you would reprogram your interface for a differnet game.
the creation
In short this interface converts an Atari joystick port to a USB redifinable keyboard Input.
The Atari joystick port was the most commonly found on the original Spectrums range of Joystick Interfaces allowing the use of the many Atari compatible joysticks such as the Quickshot, Cheetah, etc
the beauty
Due to the design the USB Keyboard HID is a standard there are no required drivers as it's built-in to most modern Platforms, This interface not only allows an Atari compatible joystick to be used on our emulators but most emulators (not just spectrum emualtors - as long as they allow keyboard input).
Plus it will work on most platforms as long as they allow USB keyboard input! Windows, Mac, Android, Linux ...
You Will Need
Parts
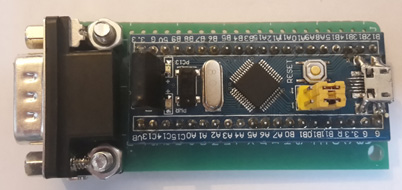
1x STM32f103c8t6 Development board
1x STM link v2 Programmer
1x 9 pin D-Sub Male PCB connector
1x 30mm x 70mm Prototyping board/PCB
2x Nuts & Bolts (4mm short or cut down bolts)
1x Micro USB cable
7x 5cm long
thin Wires for pins (IDE data cable is ideal)
optional
1x 4 Pin female header for cover on programming pins
1x 30mm x 70mm plastic to stick underneath
to protect wires
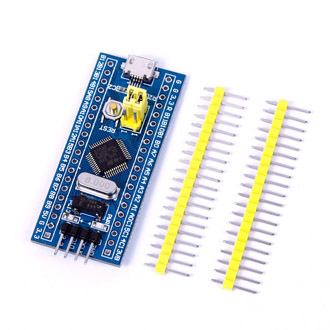
STM32F103C8T6 and Header pins
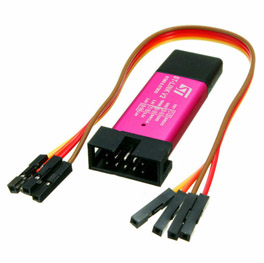
ST Link v2
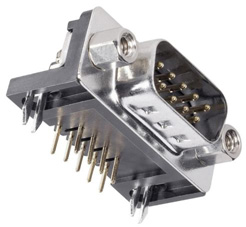
DSUB-9 Pin Male PCB Connector
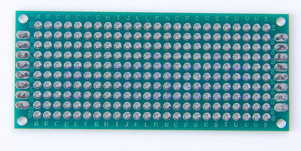
Prototyping PCB Board 30mm x 70mm
Tools Required
Screwdriver
Drill and 4mm drill bit
Soldering iron
Wire cutters
Building Steps
(1) Solder all header pins to STM32F103 (place in short end from underneath into board and solder from top)
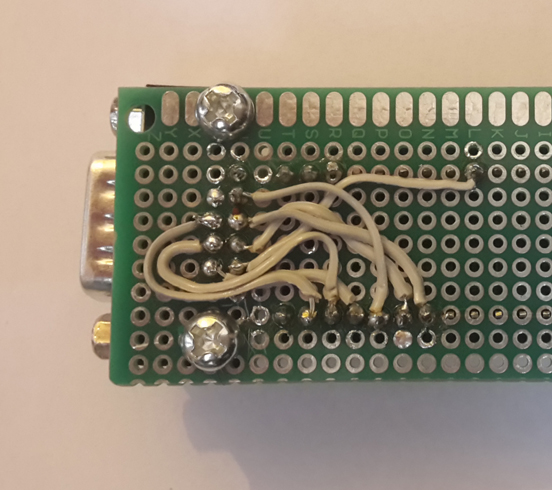
(2) You will need to bend the row of 4 pins on the bottom of the 9pin d-sub (gently) so they alighn with 4 of the 5 pins behind this way they just about insert into the protoboard pitched holes, Remove the 2 bolts on the connector and cut off the spikes which are used to go through the PCB inplace of these we will drill through the PCB (once soldered) and bolt with our own nut and bolts. Now solder the pins in place check image for more info. Drill holes for bolts and place the bolts back in the connector and bolt down to PCB.
(3) You will need to bend the 4 programming pins on the end of the STM32F103 board (again gently) bend them so the point up or at least 45 degree angle. Check images (they have a cap on just behind the d-sub)
(4) Position the STM32F103 so the USB port is at the oppisite end of the board to the d-sub 9 connector, and the programming pins you bent will just point up over it. Check Images and solder in place. Cut off the rest of the pin underneath so they doesnt stick out too far.
(5) Solder the 7 wires to the corrisponding pins. Check images.
Wiring Diagram
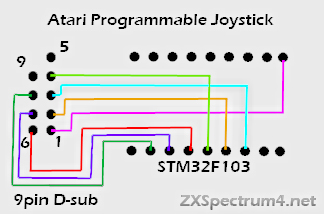
9pin d-sub pinout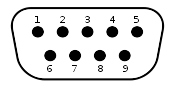
| Pin | Action |
|---|---|
| 1 | Up |
| 2 | Down |
| 3 | Left |
| 4 | Right |
| 6 | Fire |
| 7 | +5v |
| 8 | GND |
Programming
(6) Install the ST-Link V2 utility Google it.. STSW-LINK004
(7) Download the #ZXJOY programming software
(8) Plug the programmer into the board make sure you wire correctly (check image)
(9) Run the Programming software, Choose your keys, press program and wait for it to complete.
Now your interface is ready to use, Simply remove the programmng cable.
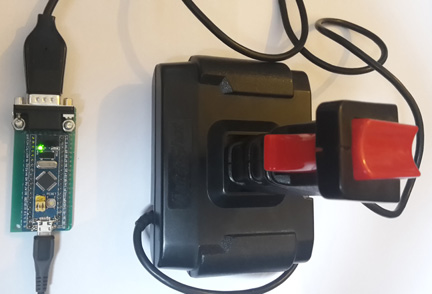
To use plug in a micro USB cable in your favourite Joystick.
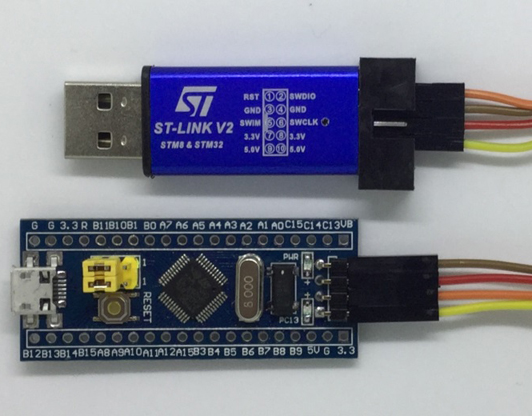
Connecting ST Link v2 to STM32F103C8T6
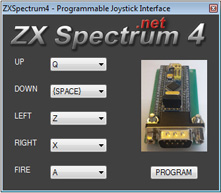
#ZXJoy
Programmer
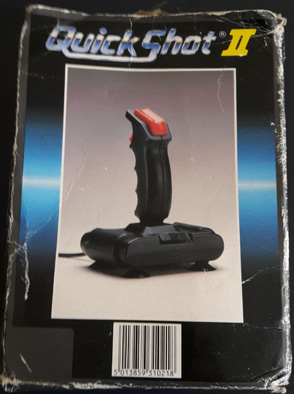
Time to dig out the Quickshot II
or your favourite flavor of Atari Joystick (for testing of course!)
Thanks for reading, please if you can help out do so - Enjoy ZXSpectrum4.net Team.
Share this page with your freinds
Tweetwe need your help!

ZX Spectrum Cassette Database
In order to maximise the database we need to find as many cassettes as possible, from unknown ones to ones known but we are unable to locate.
If you can help us with any old cassettes you may have in the loft you no longer want or know someone that has then please contact us and give them to a good home, If we can't get there in person we can get them collected by courier - please don't throw them!
Don't worry if you have no old cassettes please register your copy of the emulator by doing so helps us obtain further hardware and software for the project, and plus gives you full functionality of the emulator.
Help by donating or registering
A big "THANK YOU!" to everyone the has donated, time, money, knowledge, tapes and hardware we are truly grateful - ZXSpectrum4.net Team.
emulator

ZX Spectrum Emulator for Microsoft Windows, developed under Microsoft .net framework.
It emulates all known ZX Spectrum behaviours, timing and models 16k, 48k, 128k, +2, +3 (including 3 inch floppy disk drive and tape deck emulation), Sound, Border, Basic, Snapshot saving and more... supported file formats include .wav .tzx .sna .z80 .tap .dsk
GAMES!
We've now included a couple of games in different formats to help those non technical get started, for more help please visit the help section
Requirements
Microsoft Windows 8, 7, Vista, XP
( XP requires microsoft .net framework )
Latest Version 1.0.8305 Build: 21215 (5363)

If automatic setup fails use
manual download above

Setup click and choose 'RUN '